
Last autumn in my photography course, we focused on light. As mentioned in my last post, I joined this course to deepen my knowledge of photography. It has been a fantastic journey. I have learned to see the world differently. Especially to focus on new perspectives, whether in composition, light, or technique. Sometimes, all of them come together at once.
I especially enjoyed the light-themed month. The quiet moments in nature during the evening, seeing the world through my lens, were incredibly rewarding. In early September, I took the photos in this post. The weather was sunny and warm. This was an unusual treat in Finland, where early autumn is typically cold and rainy. It was wonderful to be outside in the evenings, free from insects and warm enough to wear just a T-shirt.
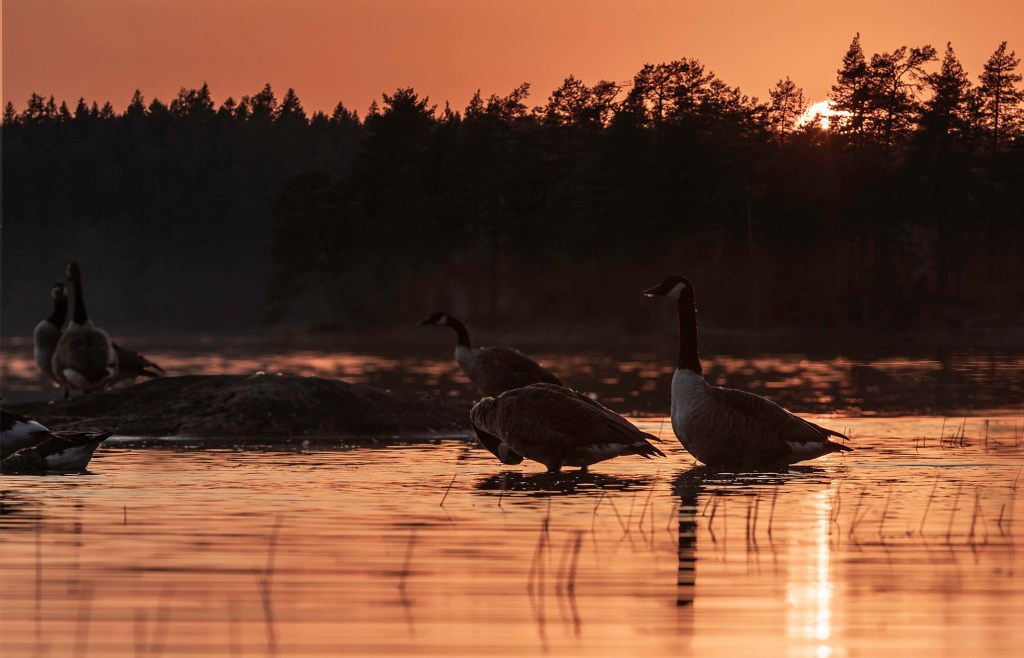
The photos in this post were taken at Lake Meiko. I have earlier shared a post about this beautiful lake and the black-throated loons that live there. In this post, I’ll highlight what I have learned about backlight during the course. Hopefully, you’ll find some useful tips to enhance your own backlight photography.
Light – amount, color, direction
Light is one of the most crucial elements in photography. The amount, color and direction of light all impact the final image. Soft morning or evening light often creates a warm and natural look. While harsh midday sunlight can result in strong shadows and high contrast. If you like high-contrast photography, legendary photographer Ansel Adams is an excellent source of inspiration.
Our assignment in light theme was to capture four images based on specific themes. Light in the morning, backlight, light in the evening and light + shadows. This post will highlight what I have learned from backlight.
Magic of backlighting
The direction of light—whether it is front, side or backlight—shapes the mood and depth of a photograph. Backlighting, or shooting against the light source, is a powerful technique that can create stunning and dramatic images. Instead of illuminating the topic from the front, the light comes from behind. This often results in a glowing or silhouetted effect.
TIP: When using backlight, position yourself so the sun is slightly off to the side. Avoid placing it directly behind your topic. This reduces excessive flare and enhances the golden glow.

I usually photograph landscapes with a wide-angle lens and sometimes with a 70-200mm lens. But, the image above was taken with a 300mm lens and a 1.4x extender. I had been photographing loons, but they were shy that evening. As the sun set, the sky turned a breathtaking shade of red. The view was so stunning that, breaking from my usual habits, I captured it using this long focal length. And yes—the loons are in the photo!
Adding depth and atmosphere to an image
One of the key benefits of backlighting is its ability to add depth and atmosphere to an image. It can create beautiful rim light around a subject, making it stand out from the background. This effect works particularly well when photographing people, plants, animals, or even misty landscapes. The light enhances textures and details.

Capturing this image was challenging because the sun’s reflection on the water was very strong. There was a risk that the brightest areas would become overexposed. To prevent this, I set my shutter speed to 1/2500 seconds. I could have also reduced the aperture, but this time I chose to adjust only the shutter speed.
Exposure control
When working with backlight, exposure control is crucial. If the camera meters for the bright background, the object can be too dark. Using exposure compensation helps balance the light. Spot metering ensures that details stay visible in both the highlights and shadows. Additionally, a lens hood or slight repositioning can help prevent lens flare. Creative use of flare can add an artistic touch to the image.
TIP: If your subject appears too dark against a bright background, try adjusting the exposure compensation (+1 or +2 stops) to reveal more details.
OBS! Exposure compensation works only in semi-automatic modes like Aperture Priority (Av), Shutter Priority (Tv), and Program (P). In these modes, the camera adjusts some settings automatically, but you can fine-tune the exposure using exposure compensation. However, in full Manual mode (M), exposure compensation is not available since you control aperture, shutter speed, and ISO yourself. The only exception is when using Manual mode with Auto ISO (M + Auto ISO). In this mode, exposure compensation can influence how the camera adjusts ISO. This helps achieve the desired exposure. But keep in mind that you decide what atmosphere you want to achieve in your frame.
Backlighting during golden hour makes magical images
Backlighting is especially magical during the golden hour when the light is warm and soft. During that time it is possible to capture a glowing portrait with backlight.

TIP: If you want stronger bokeh circles, use a lens with a wide aperture (e.g., f/2.8 or wider). The larger the aperture, the softer and rounder the bokeh will be.
My gear
I photograph with a Canon 5D Mark IV. For these photos, I used the EF 70-200mm f/2.8L IS USM and EF 300mm f/2.8L IS USM with 1.4x extender lenses. I typically use a tripod, as it significantly improves the quality of my photos. However, the geese photos were taken handheld, as a tripod is not always flexible enough for bird photography.
Thank YOU!
Thank you for visiting my blog and exploring this post! I hope you found it helpful.
I would love to hear your thoughts! Your feedback means a lot to me and helps me grow as a photographer.
Feel free to follow my blog for more stories and photography projects—there’s a link at the bottom of the page. Bye-bye!

Beautiful! The clouds swirling around the sun are spectacular! I always wondered how to achieve this.
LikeLiked by 1 person
Thank you so much Magickmermaid 😁👍
LikeLiked by 1 person
Thanks for the tips and the beautiful collection of photos. 😊
LikeLiked by 1 person
You are wellcome 😁👍
LikeLiked by 1 person
Another set of lovely photographs, Minna. I am a fan of backlighting, wildfowl and sunset and here we have all three along with the very useful tips. Thank you!
LikeLiked by 1 person
Thank you for your kind comment Carol 😁👍
LikeLike
Thanks for these great tips!
LikeLiked by 1 person
You are wellcome!
LikeLiked by 1 person
Awesome post Minna. You’ve shown that backlighting can be very effective. A favorite time for me to shoot backlighting is in an aspen forest in spring or fall.
LikeLiked by 1 person
Thank you Denise 😍 For me forest photography is difficult. I will try to photograph aspen forest this spring 😁 Thank you for a hint 👍
LikeLiked by 1 person
great pictures
LikeLiked by 1 person
Thank you so much 😁🌟🤩
LikeLiked by 1 person